HTML | Introduction
HTML is a markup language which is used by the browser to manipulate text, images and other content to display it in required format. HTML was created by Tim Berners-Lee in 1991. The first ever version of HTML was HTML 1.0 but the first standard version was HTML 2.0 which was published in 1999.
Elements and Tag: HTML uses predefined tags and elements which tells the browser about content display property. If a tag is not closed then browser applies that effect till end of page.
HTML page structure: The Basic structure of HTML page is given below. It contain some elements like head, title, body, … etc. These elements are used to build the blocks of web pages.
<DOCTYPE! html>: This tag is used to tells the HTML version. This currently tells that the version is HTML 5.
<html>: This is called HTML root element and used to wrap all the code.
<head>: Head tag contains metadata, title, page CSS etc. All the HTML elements that can be used inside the <head> element are:
- <style>
- <title>
- <base>
- <noscript>
- <script>
- <meta>
- <title>
Example: HTML page can be created using any text editor (notepad). Then save that file using .htm or .html extension and open that file in browser. It will get the HTML page response.
Features of HTML:
- It is easy to learn and easy to use.
- It is platform independent.
- Images, video and audio can be added to a web page.
- Hypertext can be added to text.
- It is a markup language.
- It is a simple markup language. Its implementation is easy.
- It is used to create a website.
- Helps in developing fundamentals about web programming.
- Boost professional career.
- HTML is used to build a websites.
- It is supported by all browsers.
- It can be integrated with other languages like CSS, JavaScript etc.
- HTML can create only static webpages so for dynamic web page other languages have to be used.
- Large amount of code has to be written to create a simple web page.
- Security feature is not good.
HTML | Basics
Below mentioned are the basic HTML tags which divides the whole document into various parts like head, body etc.
- Every HTML document begins with a HTML document tag. Although this is not mandatory but it is a good convention to start the document with this below mentioned tag:
<!DOCTYPE html>
- <html> : Every HTML code must be enclosed between basic HTML tags. It begins with <html> and ends with </html> tag.
- <head> : The head tag comes next which contains all the header information of the web page or document like the title of the page and other miscellaneous information. These informations are enclosed within head tag which opens with <head> and ends with </head>. The contents will of this tag will be explained in the later sections of course.
- <title> : We can mention the title of a web page using the <title> tag. This is a header information and hence mentioned within the header tags. The tag begins with <title> and ends with </title>
- <body> : Next step is the most important of all the tags we have learned so far. The body tag contains the actual body of the page which will be visible to all the users. This opens with <body> and ends with </body>. Every content enclosed within this tag will be shown on the web page be it writings or images or audios or videos or even links. We will see later in the section how using various tags we may insert mentioned contents into our web pages.
These tags help us to give headings to the content of a webpage. These tags are mainly written inside the body tag. HTML provides us with six heading tags from <h1> to <h6>. Every tag displays the heading in a different style and font size. Example:
<html> <head> <title>GeeksforGeeks</title> </head> <body> <h1>Hello GeeksforGeeks</h1> <h2>Hello GeeksforGeeks</h2> <h3>Hello GeeksforGeeks</h3> <h4>Hello GeeksforGeeks</h4> <h5>Hello GeeksforGeeks</h5> <h6>Hello GeeksforGeeks</h6> </body> </html> HTML | Attributes
- All HTML elements can have attributes. Attributes provide additional information about an element.
- It takes two parameters : a name and a value. These define the properties of the element and is placed inside the opening tag of the element. The name parameter takes the name of the property we would like to assign to the element and the value takes the properties value or extent of the property names that can be aligned over the element.
- Every name has some value that must be written within quotes.
Below are some of the most commonly used Attributes in HTML:
src Attribute :If we want to insert an image into a webpage, then we need to use the <img> tag and the src attribute. We will need to specify the address of the image as the attribute’s value inside the double quote.
alt Attribute : As the name goes this is an alternate tag that is used to show or display something if the primary attribute i.e., the <img> tag, fails to display the value assigned to it. This can also be used to describe the image to a developer who is actually sitting at the coding end.
- The width and height Attribute : This attribute is used to adjust the width and height of an image.
- The id Attribute : This attribute is used to provide a unique identification to an element. Situations may arise when we will need to access a particular element which may have a similar name as the others. In that case, we provide different ids to various elements so that they can be uniquely accessed. The properties extending the use of id is generally used in CSS, which we will be learning later.
- The title Attribute : The title attribute is used to explain an element on hovering the mouse over it. The behavior differs with various elements but generally the value is displayed while loading or hovering mouse pointer over it.
- The href Attribute : This attribute is used to specify a link to any address. This attribute is used along with <a> tag. The link put inside the href attribute gets linked to the text displayed inside the<a> tag.
On clicking on the text we will be redirected to the link. By default, the link gets opened in the same tag but by using the target attribute and setting its value to “_blank”, we will be redirected to another tab or another window based on the browsers configuration. - The style Attribute : This attribute is used to provide various CSS(Cascading Style Sheets) effects to the HTML elements such as increasing font-size, changing font-family, coloring etc. For a detailed explanation refer HTML | Style Tag. The program below shows few name and values that go along the style attribute
- The lang attribute : The language is declared with the lang attribute. Declaring a language is can be important for accessibility applications and search engines.
HTML | Paragraph
The <p> tag in HTML defines a paragraph. These have both opening and closing tag. So anything mentioned within <p> and </p> is treated as a paragraph. Most browsers read a line as a paragraph even if we don’t use the closing tag i.e, </p>, but this may raise unexpected results. So, it is both a good convention and we must use the closing tag.
When we look at the webpage, we see that there are few spaces added before and after a paragraph. HTML does this by default. Let’s look at few properties of paragraph tag:
- As already mentioned, the<p>tag automatically adds space before and after any paragraph, which is basically margins added by the browser.
- If a user adds multiple spaces, the browser reduces them it to a single space.
- If a user adds multiple lines, the browser reduces them to a single line
There is a way to let the HTML know where does the browser need to change the lines by the use of <br> tag. These tags do not have any closing tag. So, just a single opening tag will change the line.
The <pre> element:
We have seen how the paragraph tag ignores all the change of lines and extra spaces within a paragraph, but there is a way to preserve this by the use of <pre> tag. It also contains an opening and a closing tag. It displays a text within a fixed height and width and preserves the extra lines and spaces we use.
Syntax:
<pre> Content </pre>
Supported Browsers: Supported browsers are listed below
- Google Chrome
- Internet Explorer
- Firefox
- Opera
- Safari
HTML | Text Formatting
- Making text Bold or Strong: We can make the text bold using the <b> tag. The tag uses both opening and closing tag. The text that needs to be made bold must be within <b> and </b> tag.
We can also use the <strong> tag to make the text strong, with added semantic importance. It also opens with <strong> and ends with </strong> tag.
Example:Output:<!DOCTYPE html><html><head><title>Bold</title></head><body><!--Normal text--><p>Hello GeeksforGeeks</p><!--Text in Bold--><p><b>Hello GeeksforGeeks</b></p><!--Text in Strong--><p><strong>Hello GeeksforGeeks</strong></p></body></html>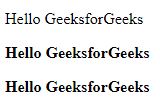
- Making text Italic or emphasize: The <i> tag is used to italicise the text. It opens with <i> and ends with </i> tag.
The <em> tag is used to emphasize the text, with added semantic importance. It opens with <em> and ends with </em> tag.
Example:Output:<!DOCTYPE html><html><head><title>Italic</title></head><body><!--Normal text--><p>Hello GeeksforGeeks</p><!--Text in Italics--><p><i>Hello GeeksforGeeks</i></p><!--Text in Emphasize--><p><em>Hello GeeksforGeeks</em></p></body></html>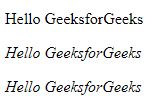
- Highlighting a text: It is also possible to highlight a text in HTML using the <mark> tag. It has a opening tag <mark> and a closing tag </mark>.
Example:Output:<!DOCTYPE html><html><head><title>Highlight</title></head><body><!--Text in Normal--><p>Hello GeeksforGeeks</p><!--Text in Highlight--><p><mark>Hello GeeksforGeeks</mark></p></body></html>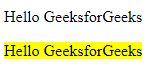
- Making a text Subscript or Superscript: The <sup> element is used to superscript a text and <sub> element is used to subscript a text. They both have opening and a closing tag.
Example:Output:<!DOCTYPE html><html><head><title>Superscript and Subscript</title></head><body><!--Text in Normal--><p>Hello GeeksforGeeks</p><!--Text in Superscript--><p>Hello <sup>GeeksforGeeks</sup></p><!--Text in Subcript--><p>Hello <sub>GeeksforGeeks</sub></p></body></html>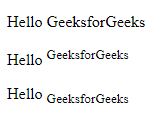
- Making text smaller: The <small> element is used to make the text smaller. The text that needs to be displayed smaller should be written inside <small> and </small> tag.
Example:Output:<!DOCTYPE html><html><head><title>Small</title></head><body><!--Text in Normal--><p>Hello GeeksforGeeks</p><!--Text in small--><p><small>Hello GeeksforGeeks</small></p></body></html>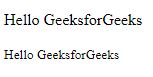
- Striking through the text: The <del> element is used to strike through the text marking the part as deleted. It also has an opening and a closing tag.
Example:Output:<!DOCTYPE html><html><head><title>Delete</title></head><body><!--Text in Normal--><p>Hello GeeksforGeeks</p><!--Text in Delete--><p><del>Hello GeeksforGeeks</del></p></body></html>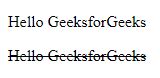
- Adding a text: The <ins> element is used to underline a text marking the part as inserted or added. It also has an opening and a closing tag.
Example:Output:<!DOCTYPE html><html><head><title>Inserting</title></head><body><!--Text in Normal--><p>Hello GeeksforGeeks</p><!--Text in Insert--><p><ins>Hello GeeksforGeeks</ins></p></body></html>HTML | Quotations
Below are some of the most used quotation elements of HTML:
- <q> element:
The <q> element is used to set a set of text inside the quotation marks. It has both opening and closing tags.
Example:
Output:<!DOCTYPE html><html><head><title>Quotations</title></head><body><h3>GeeksforGeeks</h3><p>The quick brown fox jumps over the lazy dog<br></p><!--Inside quotes--><p><q>The quick brown fox jumps over the lazy dog</q></p></body></html>
- <blockquote> element:
The <blockquote> element is also used for quotations in a different way. Instead of putting the text in quotes, it changes the alignment to make it unique from others. It has both opening and closing tags.
Example:Output:<!DOCTYPE html><html><head><title>Blockquote</title></head><body><h3>GeeksforGeeks</h3><p>The quick brown fox jumps over the lazy dog<br></p><!--Inside blockquotes--><p><blockquote>The quick brown fox jumpsover the lazy dog</blockquote></p></body></html>
- <address> element:
Using the <address> element, we can define an address in a webpage and the text put inside the address tag will be emphasized. It has both opening and closing tags.
Example:Output:<!DOCTYPE html><html><head><title>Address</title></head><body><h3>GeeksforGeeks</h3><address><p>Address:<br>710-B, Advant Navis Business Park,<br>Sector-142, Noida Uttar Pradesh – 201305</p></address></body></html>
- <abbr> element:
The <abbr> element is used to define a text as an acronym or abbreviations. The title attribute can be used to show the full version of the abbreviation/acronym when you mouse over the <abbr> element. It has both opening and closing tags. This is useful for browsers and search engines.
Example:Output:<!DOCTYPE html><html><head><title>Abbreviations</title></head><body><h3>GeeksforGeeks</h3><!--Here the marked text is the acronym--><p>Welcome to <abbrtitle="GeeksforGeeks">GfG</abbr></p></body></html>
- <bdo> element:
The <bdo> element is used to define a bidirectional override which means that the text written from right to left or left to right. It has both opening and closing tags. It is used to over-ride the current text direction.It takes an attribute “rtl” to display the text from right to left.
Example:Output:<!DOCTYPE html><html><head><title>Bidirectional</title></head><body><h3>GeeksforGeeks</h3><!--Normal text--><p>The quick brown fox jumps over the lazy dog<br></p><!--Inside <bdo> tag--><p><bdodir="rtl">The quick brown fox jumpsover the lazy dog</bdo></p></body></html>
- <cite> element:
This element is used define a title of a work and emphasizes a text.
Example:Output:<!DOCTYPE html><html><head><title>Cite</title></head><body><h3>GeeksforGeeks</h3><!--The title is kept in cite tag--><p>The <cite>GeeksforGeeks</cite> is the best site to<br>to search for articles and practice problems.</p></body></html>
HTML | Tables
- Tables are useful for various tasks such as presenting text information and numerical data.
- Tables can be used to compare two or more items in tabular form layout.
- Tables are used to create databases.
An HTML table is defined with the “table” tag. Each table row is defined with the “tr” tag. A table header is defined with the “th” tag. By default, table headings are bold and centered. A table data/cell is defined with the “td” tag.
Example:
<!DOCTYPE html> <html> <body> <table style="width:100%"> <tr> <th>Firstname</th> <th>Lastname</th> <th>Age</th> </tr> <tr> <td>Priya</td> <td>Sharma</td> <td>24</td> </tr> <tr> <td>Arun</td> <td>Singh</td> <td>32</td> </tr> <tr> <td>Sam</td> <td>Watson</td> <td>41</td> </tr> </table> </body> </html> |

Important Table options in HTML:
- Adding a border to a HTML Table: A border is set using the CSS border property. If you do not specify a border for the table, it will be displayed without borders.
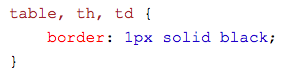 Example:
Output :<!DOCTYPE html><html><head><style>table, th, td {border: 1px solid black;}</style></head><body><tablestyle="width:100%"><tr><th>Firstname</th><th>Lastname</th><th>Age</th></tr><tr><td>Priya</td><td>Sharma</td><td>24</td></tr><tr><td>Arun</td><td>Singh</td><td>32</td></tr><tr><td>Sam</td><td>Watson</td><td>41</td></tr></table></body></html>
- Adding Collapsed Borders in a HTML Table: For borders to collapse into one border, add the CSS border-collapse property.
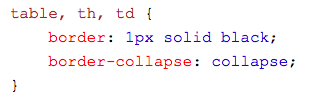 Example:
Output:<!DOCTYPE html><html><head><style>table, th, td {border: 1px solid black;border-collapse: collapse;}</style></head><body><tablestyle="width:100%"><tr><th>Firstname</th><th>Lastname</th><th>Age</th></tr><tr><td>Priya</td><td>Sharma</td><td>24</td></tr><tr><td>Arun</td><td>Singh</td><td>32</td></tr><tr><td>Sam</td><td>Watson</td><td>41</td></tr></table></body></html>
- Adding Cell Padding in a HTML Table: Cell padding specifies the space between the cell content and its borders.If we do not specify a padding, the table cells will be displayed without padding.

Example:Output:<!DOCTYPE html><html><head><style>table, th, td {border: 1px solid black;border-collapse: collapse;}th, td {padding: 20px;}</style></head><body><tablestyle="width:100%"><tr><th>Firstname</th><th>Lastname</th><th>Age</th></tr><tr><td>Priya</td><td>Sharma</td><td>24</td></tr><tr><td>Arun</td><td>Singh</td><td>32</td></tr><tr><td>Sam</td><td>Watson</td><td>41</td></tr></table></body></html>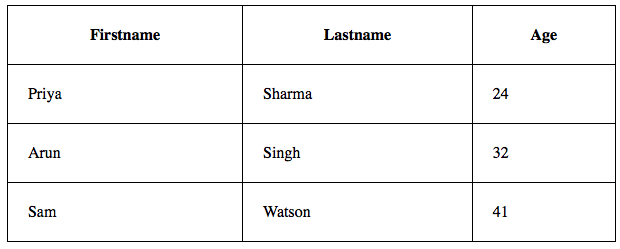
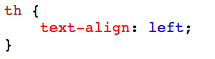
- Adding Left Align Headings in a HTML Table : By default the table headings are bold and centered. To left-align the table headings,we must use the CSS text-align property.
 Example:
Output:<html><head><style>table, th, td {border: 1px solid black;border-collapse: collapse;}th, td {padding: 20px;}th {text-align: left;}</style></head><body><tablestyle="width:100%"><tr><th>Firstname</th><th>Lastname</th><th>Age</th></tr><tr><td>Priya</td><td>Sharma</td><td>24</td></tr><tr><td>Arun</td><td>Singh</td><td>32</td></tr><tr><td>Sam</td><td>Watson</td><td>41</td></tr></table></body></html>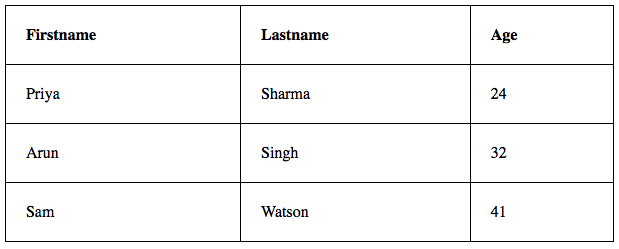
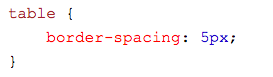
- Adding Border Spacing in a HTML Table: Border spacing specifies the space between the cells. To set the border spacing for a table,we must use the CSS border-spacing property.
Example:Output:<html><head><style>table, th, td {border: 1px solid black;}table {border-spacing: 5px;}</style></head><body><tablestyle="width:100%"><tr><th>Firstname</th><th>Lastname</th><th>Age</th></tr><tr><td>Priya</td><td>Sharma</td><td>24</td></tr><tr><td>Arun</td><td>Singh</td><td>32</td></tr><tr><td>Sam</td><td>Watson</td><td>41</td></tr></table></body></html>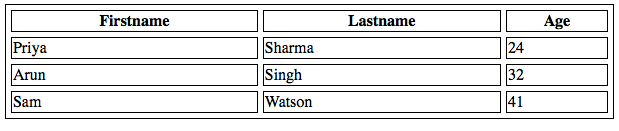
- Adding Cells that Span Many Columns in HTMl Tables : To make a cell span more than one column, we must use the colspan attribute.
Example:Output:<!DOCTYPE html><html><head><style>table, th, td {border: 1px solid black;border-collapse: collapse;}th, td {padding: 5px;text-align: left;}</style></head><body><h2>Cell that spans two columns:</h2><tablestyle="width:100%"><tr><th>Name</th><thcolspan="2">Telephone</th></tr><tr><td>Vikas Rawat</td><td>9125577854</td><td>8565557785</td></tr></table></body></html>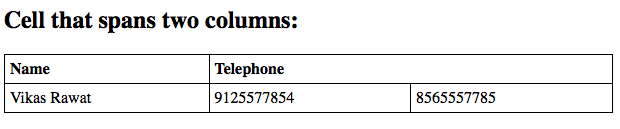
- Adding Cells that Span Many Rows in HTML Tables: To make a cell span more than one row,we must use the rowspan attribute:
Example:Output:<!DOCTYPE html><html><head><style>table, th, td {border: 1px solid black;border-collapse: collapse;}th, td {padding: 5px;text-align: left;}</style></head><body><h2>Cell that spans two rows:</h2><tablestyle="width:100%"><tr><th>Name:</th><td>Vikas Rawat</td></tr><tr><throwspan="2">Telephone:</th><td>9125577854</td></tr><tr><td>8565557785</td></tr></table></body></html>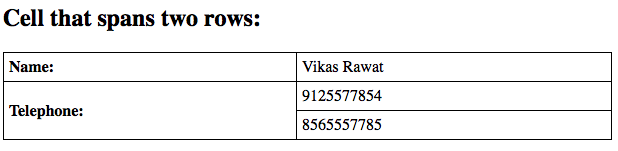
- Adding a Caption in a HTML Table: To add a caption to a table, we must use the “caption” tag.

Example:Output:<html><head><style>table, th, td {border: 1px solid black;border-collapse: collapse;}th, td {padding: 20px;}th {text-align: left;}</style></head><body><tablestyle="width:100%"><caption>DETAILS</caption><tr><th>Firstname</th><th>Lastname</th><th>Age</th></tr><tr><td>Priya</td><td>Sharma</td><td>24</td></tr><tr><td>Arun</td><td>Singh</td><td>32</td></tr><tr><td>Sam</td><td>Watson</td><td>41</td></tr></table></body></html>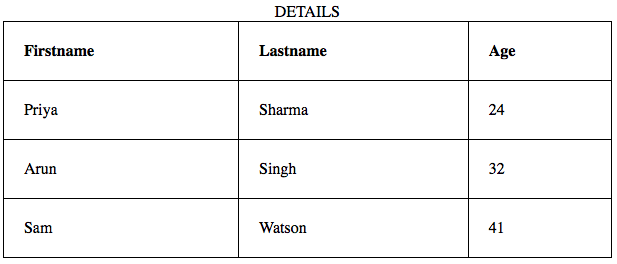
- Adding a Background Colour To a Table in HTML: A color can be added as a background in HTML table using the “background-color” option.
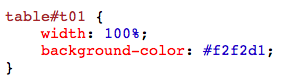
Example:Output:<!DOCTYPE html><html><head><style>table, th, td {border: 1px solid black;border-collapse: collapse;}th, td {padding: 5px;text-align: left;}table#t01 {width: 100%;background-color: #f2f2d1;}</style></head><body><tablestyle="width:100%"><tr><th>Firstname</th><th>Lastname</th><th>Age</th></tr><tr><td>Priya</td><td>Sharma</td><td>24</td></tr><tr><td>Arun</td><td>Singh</td><td>32</td></tr><tr><td>Sam</td><td>Watson</td><td>41</td></tr></table><br/><br/><tableid="t01"><tr><th>Firstname</th><th>Lastname</th><th>Age</th></tr><tr><td>Priya</td><td>Sharma</td><td>24</td></tr><tr><td>Arun</td><td>Singh</td><td>32</td></tr><tr><td>Sam</td><td>Watson</td><td>41</td></tr></table></body></html>
- Creating Nested Tables in HTML: Nesting tables simply means making a Table inside another Table. Nesting tables can lead to complex tables layouts, which are visually interesting and have the potential of introducing errors.
Example:Output:<!DOCTYPE html><html><body><tableborder=5bordercolor=black><tr><td>Fisrt Column of Outer Table</td><td><tableborder=5bordercolor=grey><tr><td>First row of Inner Table</td></tr><tr><td>Second row of Inner Table</td></tr></table></td></tr></table></body></html>HTML | Lists
A list is a record of short pieces of information, such as people’s names, usually written or printed with a single thing on each line and ordered in a way that makes a particular thing easy to find.
For example:
- A shopping list
- To-do list
HTML offers three ways for specifying lists of information. All lists must contain one or more list
elements.
The types of lists that can be used in HTML are :
- ul : An unordered list. This will list items using plain bullets.
- ol : An ordered list. This will use different schemes of numbers to list your items.
- dl : A definition list. This arranges your items in the same way as they are arranged in a dictionary.
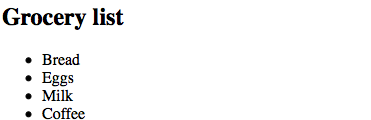
An unordered list starts with the “ul” tag. Each list item starts with the “li” tag.The list items are marked with bullets i.e small black circles by default. Example:
<!DOCTYPE html> <html> <body> <h2>Grocery list</h2> <ul> <li>Bread</li> <li>Eggs</li> <li>Milk</li> <li>Coffee</li> </ul> </body> </html> |
The HTML Unordered List has various List Item Markers:-
- Disc : Sets the list item marker to a bullet i.e default. Output :
<!DOCTYPE html><html><body><h2>Unordered List with Disc Bullets</h2><h2>Grocery List</h2><ulstyle="list-style-type:disc"><li>Bread</li><li>Eggs</li><li>Milk</li><li>Coffee</li></ul></body></html>
- Circle : Sets the list item marker to a circle. Output :
<!DOCTYPE html><html><body><h2>Unordered List with Circle Bullets</h2><h2>Grocery list</h2><ulstyle="list-style-type:circle"><li>Bread</li><li>Eggs</li><li>Milk</li><li>Coffee</li></ul></body></html>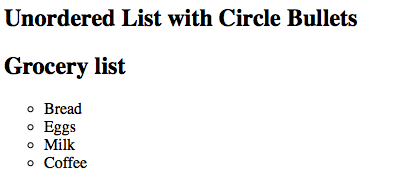
- Square : Sets the list item marker to a square. Output :
<!DOCTYPE html><html><body><h2>Unordered List with Square Bullets</h2><h2>Grocery list</h2><ulstyle="list-style-type:square"><li>Bread</li><li>Eggs</li><li>Milk</li><li>Coffee</li></ul></body></html>
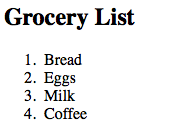
An ordered list starts with the “ol” tag. Each list item starts with the “li” tag. The list items are marked with numbers by default.
Example:
<!DOCTYPE html> <html> <body> <h2>Grocery List</h2> <ol> <li>Bread</li> <li>Eggs</li> <li>Milk</li> <li>Coffee</li> </ol> </body> </html> |
The HTML Ordered List has various List Item Markers:
The type attribute of the <ol> tag, defines the type of the list item marker.
- Type=”1″ : The list items will be numbered with numbers i.e default. Output :
<!DOCTYPE html><html><body><h2>Ordered List with Numbers</h2><oltype="1"><li>Bread</li><li>Eggs</li><li>Milk</li><li>Coffee</li></ol></body></html>
- Type=”A” : The list items will be numbered with uppercase letters. Output :
<!DOCTYPE html><html><body><h2>Ordered List with Letters</h2><oltype="A"><li>Bread</li><li>Eggs</li><li>Milk</li><li>Coffee</li></ol></body></html>
- Type=”a” : The list items will be numbered with lowercase letters. Output :
<!DOCTYPE html><html><body><h2>Ordered List with Lowercase Letters</h2><oltype="a"><li>Bread</li><li>Eggs</li><li>Milk</li><li>Coffee</li></ol></body></html>
- Type=”I” : The list items will be numbered with uppercase roman numbers. Output :
<!DOCTYPE html><html><body><h2>Ordered List with Roman Numbers</h2><oltype="I"><li>Bread</li><li>Eggs</li><li>Milk</li><li>Coffee</li></ol></body></html>
- Type=”i” : The list items will be numbered with lowercase roman numbers. Output :
<!DOCTYPE html><html><body><h2>Ordered List with Lowercase Roman Numbers</h2><oltype="i"><li>Bread</li><li>Eggs</li><li>Milk</li><li>Coffee</li></ol></body></html>
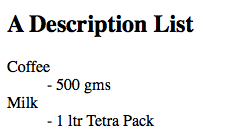
A description list is a list of terms, with a description of each term.
The <dl> tag defines the description list, the <dt> tag defines the term name, and the <dd> tag describes each term.
Example:
<!DOCTYPE html> <html> <body> <h2>A Description List</h2> <dl> <dt>Coffee</dt> <dd>- 500 gms</dd> <dt>Milk</dt> <dd>- 1 ltr Tetra Pack</dd> </dl> </body> </html> |
Nested List in HTML:
A nested list is a list which has a list inside a list.<!DOCTYPE html> <html> <body> <h2>A Nested List</h2> <ul> <li>Coffee</li> <li>Tea <ul> <li>Black tea</li> <li>Green tea</li> </ul> </li> <li>Milk</li> </ul> </body> </html> |

HTML | Spell Check
The Spell Check feature can be applied to HTML forms using the spellcheck attribute. The spellcheck attribute is an enumerated attribute which defines whether the HTML element will be checked for errors or not. It can be used with “input” and “textarea” fields in HTML.
Syntax :
Syntax for spellcheck attribute in an input field in html:
<input type="text" spellcheck="value">Syntax for spellcheck in a textarea field in html:
<textarea type="text" spellcheck="value"></textarea>In the above syntax the value assigned to spellcheck will define whether spellcheck will be enabled or not on the element. The spellcheck attribute has two valid values, which are:
- True :It defines that the HTML element should be checked for errors.
- False :It defines that the HTML element should not be checked for errors.
Enabling Spell Check in an HTML Form: To enable spellcheck in an HTML form the spellcheck attribute is set to “true”. Below is the sample HTML program with enabled spellcheck.
- Eaxmple:1
<!DOCTYPE html><html><body><h3>Example of Enabling SpellCheck</h3><form><p><inputtype="text"spellcheck="true"></p><p><textareaspellcheck="true"></textarea></p><buttontype="reset">Reset</button></form></body></html> - Output:

- Eaxmple:2
<!DOCTYPE html><html><body><h3>Example of Disabling SpellCheck</h3><form><p><inputtype="text"spellcheck="false"></p><p><textareaspellcheck="false"></textarea></p><buttontype="reset">Reset</button></form></body></html> - Output:

HTML | Images
Earlier, the webpages used to comprise of only texts, which made them appear quite boring and uninteresting. Fortunately, it wasn’t long enough that the ability to embed images on web pages was added for users. Let’s see how to add images on a webpage.
Adding images on a webpage :
The “img” tag is used to add images on a webpage. The “img” tag is an empty tag, which means it can contain only a list of attributes and it has no closing tag.
Syntax :
Output :
Setting width and height of Image :The width and height attributes are used to specify the height and width of an image. The attribute values are specified in pixels by default.
Example:
Output :
Adding animated Image: Animated images in .gif format can also be added using the “img” tag.
Output :
Adding images on a webpage :
The “img” tag is used to add images on a webpage. The “img” tag is an empty tag, which means it can contain only a list of attributes and it has no closing tag.
Syntax :
<img src="url" alt="some_text">Attribute:
- src:
src stands for source. Every image has a src attribute which tells the browser where to find the image you want to display. The URL of the image provided points to the location where the image is stored. - alt:If the image cannot be displayed then the alt attribute acts as an alternative description for the image. The value of the alt attribute is an user-defined text.
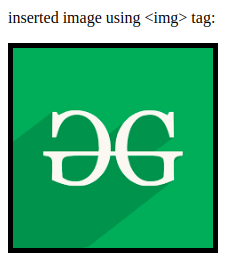
<!DOCTYPE html> <html> <head> <title>Inserting an image using "img" tag</title> </head> <body> <p>inserted image using <img> tag:</p> <img src= alt="GeeksforGeeks logo"> </body> </html> |
Setting width and height of Image :The width and height attributes are used to specify the height and width of an image. The attribute values are specified in pixels by default.
Example:
<!DOCTYPE html> <html> <head> <title>Inserting an image using "img" tag</title> </head> <body> <p>inserted image using <img> tag:</p> <img src= alt="GeeksforGeeks logo" width="300" height="300"> </body> </html> |
Adding animated Image: Animated images in .gif format can also be added using the “img” tag.
<!DOCTYPE html> <html> <h3>Adding a gif file on a webpage</h3> <body> <img src = "smiley.gif" alt = "smiley" style = "width:200px; height:200px;"> </body> </html> |
Video Player
00:00
00:07
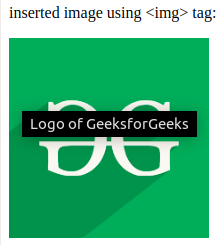
Adding titles to Image: Along with the images, titles can also be added to images to provide further information related to the inserted image. For inserting a title, the title attribute is used.
Example:
<!DOCTYPE html> <html> <head> <title>Inserting an image using "img" tag</title> </head> <body> <p>inserted image using <img> tag:</p> <img src= alt="GeeksforGeeks logo" width="200" height="200" title="Logo of GeeksforGeeks"> </body> </html> |
Setting a border to Image :By default, every picture has a border around it. By using the border attribute, the thickness of the border can be changed. A thickness of “0” means that there will be no border around the picture.
Example:
<!DOCTYPE html> <html> <head> <title>Inserting an image using "img" tag</title> </head> <body> <p>inserted image using <img> tag:</p> <img src= alt="GeeksforGeeks logo" width="200" height="200" border="5"> </body> </html> |
Aligning a Picture: By default, an image is aligned at the left side of the page, but it can be aligned to center or right using the align attribute.
<!DOCTYPE html> <html> <head> <title>Inserting an image using "img" tag</title> </head> <body> <p>inserted image using <img> tag:</p> <img src= alt="GeeksforGeeks logo" align="right"> </body> </html> |

Adding Image as a Link: An image can work as a link with a URL embedded in it. It can be done by using the “img” tag inside an “a” tag.
<!DOCTYPE html> <html> <head> <title>Inserting an image using "img" tag</title> </head> <body> <p>inserted image using <img> tag:</p> <img src= alt="GeeksforGeeks logo"> </a> </body> </html> |
Before clicking the picture:
After clicking the picture:

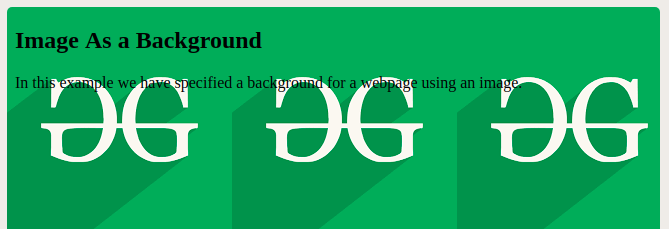
Using Image as a background: An image can be used a background for a webpage.
Example:
<!DOCTYPE html> <!DOCTYPE html> <html> <body style="background-image:url <h2>Image As a Background</h2> <p>In this example we have specified a background for a webpage using an image. </p> </body> </html> |
Comments
Post a Comment