Removing Multiple Tools From A Group
We'll come back to the Artboard Tool a bit later. Let's look at a different example. Here we have the group containing the Rectangular Marquee Tool, the Elliptical Marquee Tool, the Single Row Marquee Tool, and the Single Column Marquee Tool. These are Photoshop's basic selection tools: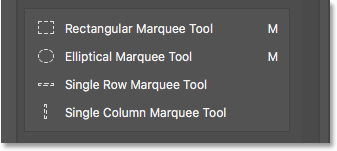
The Marquee Tools group.
The Rectangular Marquee Tool and the Elliptical Marquee Tool both get plenty of use. But the only time I ever really use the Single Row or Single Column Marquee Tool is when I'm trying to turn a photo into an interesting background. I'd like to keep the Rectangular and Elliptical Marquee Tools in the main Toolbar but move the other two over to the Extra Tools column.To do that, I'll start by separating the Single Row and Single Column Marquee Tools from the group. I'll remove the Single Column Marquee Tool first by clicking and dragging it downward until the blue bar appears below the group:
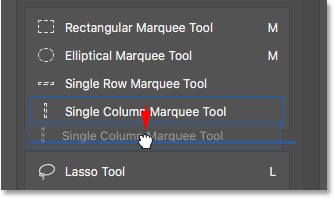
Ungrouping the Single Column Marquee Tool.
I'll release my mouse button to drop the tool into place, and I now have the Single Column Marquee Tool separate from the others: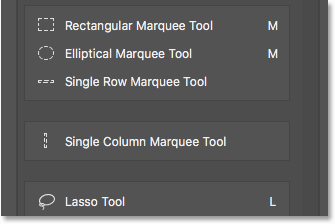
The Single Column Marquee Tool is now separate from the group.
Creating A New Tool Group
Next, I'll click on the Single Row Marquee Tool and drag it downward as well. But rather than making it another independent tool, I'll create a new group to hold the Single Row and Single Column Marquee Tools. To do that, I'll position my hand cursor so that the blue bar appears just inside the top of the Single Column Marquee Tool's box: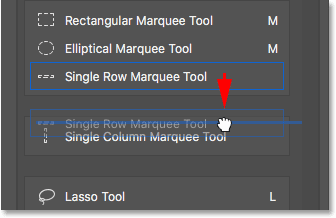
Dragging the Single Row Marquee Tool into the Single Column Marquee Tool box.
When I release my mouse button, Photoshop ungroups the Single Row Marquee Tool from the Rectangular and Elliptical Marquee Tools and places it in a brand new group with the Single Column Marquee Tool: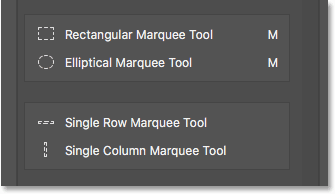
The Single Row and Single Column Marquee Tools now sit inside their own group.
The Default Tool
If we look in my actual Toolbar, we see the new group sitting between the Rectangular Marquee Tool and the Lasso Tool. Notice that it's the Single Row Marquee Tool's icon that we're seeing. The Single Column Marquee Tool is currently nested behind it. This means that to get to the Single Column Marquee Tool, I would need to right-click (Win) / Control-click (Mac) on the Single Row Marquee Tool. Then, I could select the Single Column Marquee Tool from the fly-out menu:
The Single Row Marquee Tool is displayed in the Toolbar. The other tool is hiding behind it.
How does Photoshop know which tool in the group to display in the Toolbar and which tool(s) to nest behind it? It knows because Photoshop considers the tool at the top of the group to be the default tool. The default tool is the one that gets displayed first.How To Change The Default Tool For a Group
To change the default tool, all we need to do is drag a different tool to the top of the group. For example, if I want the Single Column Marquee Tool to be the default tool, all I need to do is click on it and drag it above the Single Row Marquee Tool. Notice that I'm not dragging it completely out of the group. I'm positioning my hand cursor so that the blue bar appears just inside the top of the group: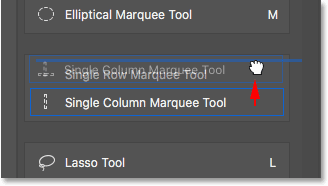
Dragging the Single Column Marquee Tool above the Single Row Marquee Tool in the group.
When I release my mouse button, Photoshop drops the Single Column Marquee Tool above the Single Row Marquee Tool, making it the new default tool: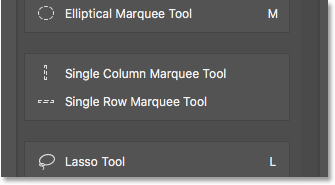
The Single Column Marquee Tool is now the group's default tool.
And if we look again in my Toolbar, we see that the Single Column Marquee Tool is now the one that's actually displayed. The Single Row Marquee Tool is now nested behind it:
The Single Column Marquee Tool's icon is now displayed in the Toolbar.
How To Move Entire Tool Groups At Once
We've seen how to drag individual tools from one column to the other. We can also drag entire groups. With the Single Row and Single Column Marquee Tools now in their own separate group, I can easily move them both into the Extra Tools column. To drag a group, first position your mouse cursor over the edge of the group. A blue highlight box will appear around the group. This lets you know that you're selecting the group as a whole: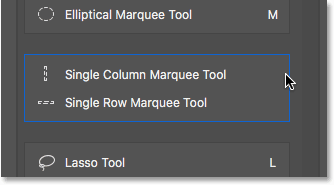
Highlighting the group by positioning my mouse cursor over its edge.
Then, just as you would with an individual tool, click and drag the group over to the Extra Tools column: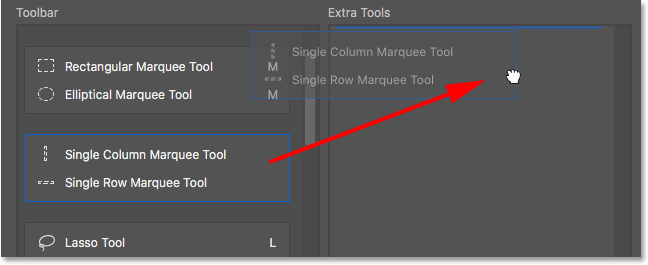
Dragging the entire group into the Extra Tools column.
I'll release my mouse button, at which point Photoshop moves both tools to the Extra Tools column at the same time. You can do the same thing in the opposite direction as well, moving an entire group from the Extra Tools column into the Toolbar column:
The tools have been moved as a group into the Extra Tools column.
How To Rearrange The Order Of The Tools In The Toolbar
Let's go back to the Artboard Tool for a moment. It's currently sitting directly below my Move Tool at the top of the Toolbar: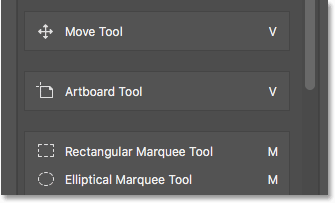
The Artboard Tool currently sits near the top.
One thing you might want to do when customizing your Toolbar is move the tools you use the most to the top of the Toolbar and move the ones you don't use as often further down. Even though I do use the Artboard Tool, I don't use it enough for it to be taking up a spot near the top. In fact, it probably belongs closer to the bottom, which means I should move it.To rearrange the order of the tools, click on the one you want to move and drag it up or down into its new spot. Again, keep an eye on the blue horizontal bar that appears below your hand cursor so you don't group the tool in with other tools by mistake. Here, I'm dragging the Artboard Tool down below the group containing the Lasso, Polygonal Lasso and Magnetic Lasso Tools:
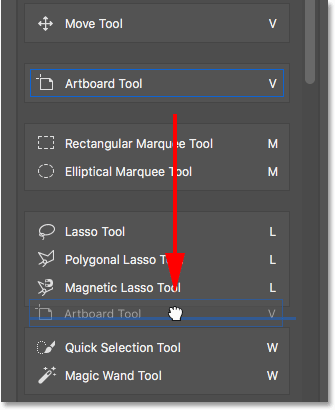
Dragging the Artboard Tool below the Lasso Tools group.
I'll release my mouse button to drop the Artboard Tool into place. So far, so good: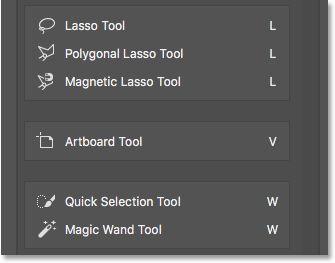
The Artboard Tool has been moved further down the Toolbar.
A Faster Way To Reorder Tools
I've moved the Artboard Tool further down the list, but not nearly far enough. I actually want to place it directly above the Hand Tool which is way down near the bottom. This means there's still a whole lot of tools between the spot where the Artboard Tool currently sits and the spot I want to move it to.Rather than slowly dragging the Artboard Tool down across all the tools in between, what I'll do is click and drag the Artboard Tool into the Extra Tools column temporarily. I'm not actually making the Artboard Tool an extra tool. I'm just using the Extra Tools column as temporary storage:
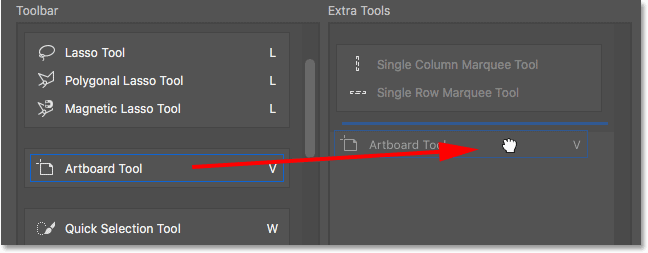
Using the Extra Tools column to temporarily hold the Artboard Tool.
Then, I'll use the scroll bar along the right of the Toolbar column to quickly scroll down to the spot where I want to place the Artboard Tool. In this case, it's above the Hand Tool: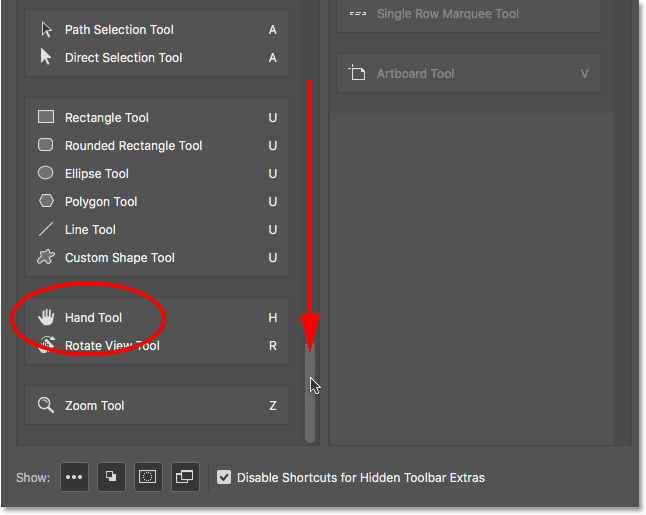
Scrolling down to the Hand Tool in the Toolbar column.
I'll drag the Artboard Tool back into the Toolbar column, dropping it into place above the Hand Tool: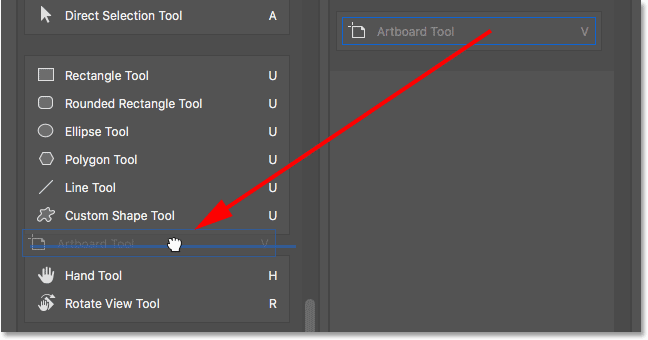
Dragging the Artboard Tool above the Hand Tool.
And now, the Artboard Tool is right where I wanted it: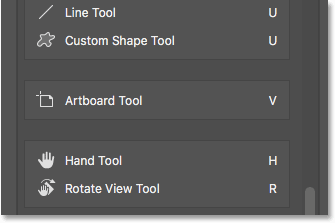
The Artboard Tool now sits above the Hand Tool.
Again, we can see the change I've made in the Toolbar itself. You can move entire groups up and down the toolbar just as easily. Simply move your mouse cursor over the edge of the group to highlight it. Then, drag it up or down the Toolbar as needed. Or, as I did with the Artboard Tool, drag the group into the Extra Tools column temporarily. Scroll to the spot you need in the Toolbar column, then drag the group back into the Toolbar column and drop it into place:
The Toolbar showing the Artboard Tool's new home.

If, on the other hand, you want to keep the keyboard shortcuts active for all of your tools regardless of whether they're in the main Toolbar or the Extra Tools section, then you'll want to uncheck this option. Personally, I leave it checked:




How To Disable Keyboard Shortcuts For Extra Tools
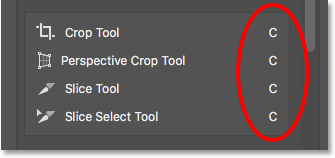
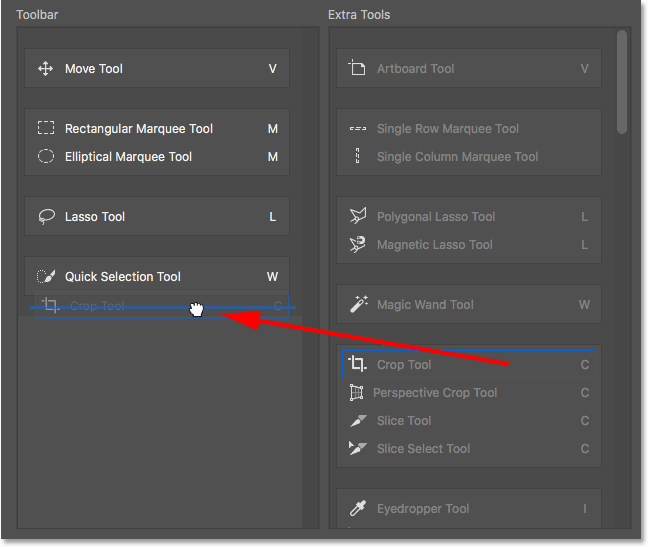
Let's look at the group made up of the Crop Tool, the Perspective Crop Tool, the Slice Tool, and the Slice Select Tool. If you look to the right of the tool names, you'll see that all four tools share the same keyboard shortcut. In this case, they're all selectable by pressing the letter C. So, if I press the letter C once on my keyboard, I'll select the first tool in the group (the Crop Tool). If I then press and hold my Shift key and continue pressing C repeatedly, I can cycle through the other tools in the group:
The Crop and Slice Tools are share the same keyboard shortcut.
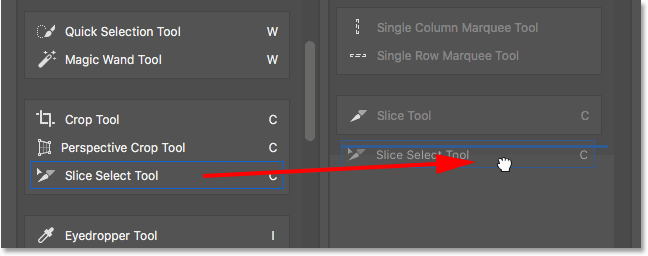
I want to keep the Crop and Perspective Crop Tools in the main Toolbar but move the Slice and Slice Select Tools into the Extra Tools column. We've already learned how to do this, so I'll save us a bit of time by dragging them over quickly:
Clicking and dragging the Slice and Slice Select Tools into the Extra Tools column.
Notice that even though these tools have been moved out of the main Toolbar column, they're still showing the same keyboard shortcut as before. Moving them to the Extra Tools column did not remove the shortcut:
Tools keep their keyboard shortcuts even when dragged into the Extra Tools column.
The "Disable Shortcuts for Hidden Toolbar Extras" Option
If you look along the bottom of the Customize Toolbar dialog box, you'll see an option that says Disable Shortcuts for Hidden Toolbar Extras. By default, it's selected (checked). If you no longer want your extra tools to be selectable using their keyboard shortcuts, leave this option checked. That way, only the main tools in the Toolbar will remain selectable from the keyboard. Extra tools will need to be selected directly from the Extra Tools area.If, on the other hand, you want to keep the keyboard shortcuts active for all of your tools regardless of whether they're in the main Toolbar or the Extra Tools section, then you'll want to uncheck this option. Personally, I leave it checked:

The "Disable Shortcuts for Hidden Toolbar Extras" option.
How To Add Keyboard Shortcuts
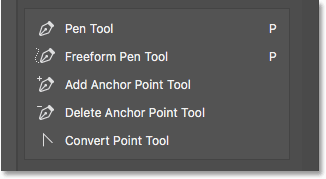
We can also use the Customize Toolbar dialog box to add keyboard shortcuts to tools that didn't originally have one. For example, here we have the group made up of the Pen Tool, the Freeform Pen Tool, the Add Anchor Point Tool, the Delete Anchor Point Tool, and the Convert Point Tool:
The Pen Tool group.
I'm going to quickly drag the Add Anchor Point and Delete Anchor Point Tools into the Extra Tools column:
Dragging the Add and Delete Anchor Point Tools into the Extra Tools column.
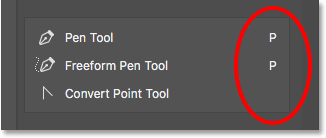
This leaves just the Pen Tool, the Freeform Pen Tool and the Convert Point Tool in the group. Notice that both the Pen Tool and the Freeform Pen Tool share the letter P as their keyboard shortcut. Yet the Convert Point Tool does not. In fact, it has no keyboard shortcut at all:
Two of the three remaining tools in the group share the same keyboard shortcut. One does not.
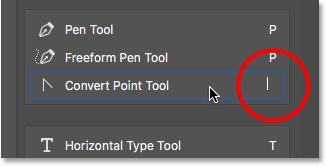
Since all three tools are part of the same group, it would make more sense if they all shared that keyboard shortcut. To add the keyboard shortcut to the Convert Point Tool, all I need to do is click on the tool to select it. A little text cursor appears in the blank spot where the keyboard shortcut would normally be:
Selecting the tool to add a keyboard shortcut.
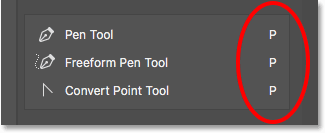
I'll press the letter P on my keyboard to set it as the new shortcut, then I'll press Enter (Win) / Return (Mac) to accept the change. And now, all three tools in the group share the same shortcut:
Choose the letter from your keyboard, then press Enter (Win) / Return (Mac).
How To Clear All Tools From The Toolbar
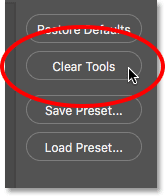
So far, we've been spending most of our time dragging tools from the Toolbar column on the left into the Extra Tools column on the right. But if you really want to streamline things and keep only a few tools in the main Toolbar, click the Clear Tools button in the upper right of the dialog box:
Clicking the Clear Tools button.
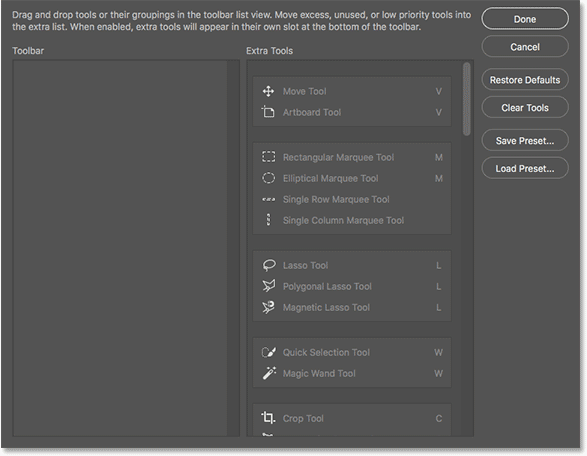
This instantly moves every tool into the Extra Tools column, leaving the main Toolbar column completely empty:
The Clear Tools button makes every tool an extra tool.
You can then drag just the few tools (or groups) you need into the Toolbar column:
The Clear Tools feature is a good way to save time when you only need a few tools in the main Toolbar.
Hiding The Other Toolbar Options
If you look below the tools, down at the very bottom of the Toolbar, you'll find a few more icons. Starting from the top, we have the Ellipsis icon (that we've already looked at) for choosing the Edit Toolbar command as well as for viewing our extra tools. Below that is the Foreground/Background Colors icon, the Quick Mask Mode icon, and finally, the Screen Mode icon:
The additional options at the bottom of the Toolbar.
You can turn any or all of these icons off by clicking to deselect them along the bottom of the Customize Toolbar dialog box. To turn them back on, simply click on them again. Note, though, that if you hide the Ellipsis icon from the Toolbar, you'll no longer be able to view the Extra Tools area (which means you'll lose access to any hidden tools). Also, you'll only be able to access the Customize Toolbar dialog box by going up to the Edit menu at the top of the screen and choosing Toolbar:
Click the icons along the bottom of the dialog box to show or hide these options in the Toolbar.
Comments
Post a Comment